One of the commonly-used feature of Todo is Custom Lists. These allow you to categorize your to-dos by area of focus. For example, it’s common that we’ll see users with lists like:
- Home
- Work
- Honey-do
- Groceries
- Personal
- Etc.
In Todo you are able to create and customize these types of lists. Having them allows you to better organize and plan how you’ll get things done. Here’s a quick guide to how to create/edit Custom Lists and what options are available to you.
Creating a List
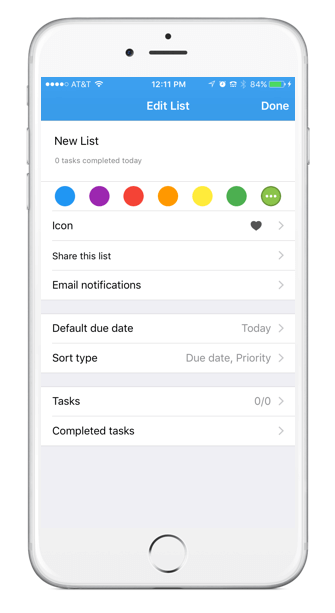 Creating a Custom List is easy, just scroll to the bottom of the screen and tap “Add a list”. You are then brought to the “Edit List” screen and presented with a variety of options. This same screen is available for existing lists and can be accessed by swiping left on the list name.
Name your list – “Work”, “Honey-do”, “Groceries”, “Gym” – whatever you’d like.
Assign your list a color – We’ve found that these are especially helpful to those who respond to visual queues.
Add an icon – This is a fun little feature which allows you to select an icon that relates to the theme of your list. One of those small things that allows you to make Todo Cloud “yours”.
Sharing options – You can select other users to share this list. Sharing lists is common between couples, families and teams. To share this list you’ll tap “Invite someone to this list” and you can either:
- Directly input the email of the person you’d like to share the list with
- Select from a list of those that you’re already sharing lists with
- Select from the contacts on your phone
If the individual you want to share a list with is a current user of Todo, they’ll receive the invite within the app. If they are not a Todo user, they’ll receive an invitation to download Todo to start collaborating with you.
Email notifications – This is where you can determine what activity within shared lists that you’d like to be alerted of via email. Your options are:
- Tasks – when someone adds, deletes or changes a task
- Comments – when someone adds or removes a comment on a task
- Members – when someone is added or removed from the list
- Assigned only – only receive notifications for tasks that are assigned to you
By default, “Tasks”, “Comments” and “Members” are selected, however you can change this any time by editing the list settings. Remember that to edit a list’s settings you simply swipe left on the list.
Default due date – You are able to set a default due date for any task that is created from within the list. Your options are:
- App Default – this is accessed on the general app settings screen (these are accessed by tapping on your name in the top left of the list view)
- None
- Today
- Tomorrow
- In Two Days
- In Three Days
- In Four Days
- In Five Days
- In Six Days
For example, I could have all tasks that I create while viewing my “Home” list to be due tomorrow. But let’s say that I have a list for “Action Items” for weekly team meetings and I know that all action items are due before next week’s meeting. I can set the default due date for my “Action Items” list to be “In Six Days”.
Sort type – This options allows you to change the order in which tasks appear in your Smart List.
- App Default – this is accessed on the general app settings screen (these are accessed by tapping on your name in the top left of the list view)
- Due date, Priority
- Priority, Due date
- Alphabetical
Tasks – This is given to you in a “0/0” format. The first number represents the number of active (non-completed) tasks and second represents the total number of tasks being stored on the device (completed + non-completed). By selecting this line you are able to view all the tasks in the specific list.
Completed tasks – This shows you the number of completed tasks from this list that are being stored on the device. By selecting this line you are able to view all the completed tasks from the specific list.
Pro Tips
Here are a couple of things to do to help you maximize your use of Custom Lists in Todo.
Assign like-lists the same color – A common practice used by some of the members of the Todo Team (and many of our users), is to assign like-lists the same color. For example, lists that relate to my professional life are the same color as are those that relate to work and also those that are shared with others.
Use list spacers – By long-pressing on “Add a list” you are presented with the option to “Add a spacer” which is simply a line that creates visual separation between groups of lists. Once you’ve added a spacer you can long-press it to drag it in place. When you want to delete it, just drag it to the bottom of your screen.
List spacers are commonly used to separate groups of like-lists (e.g. lists related to work vs. lists related to home).

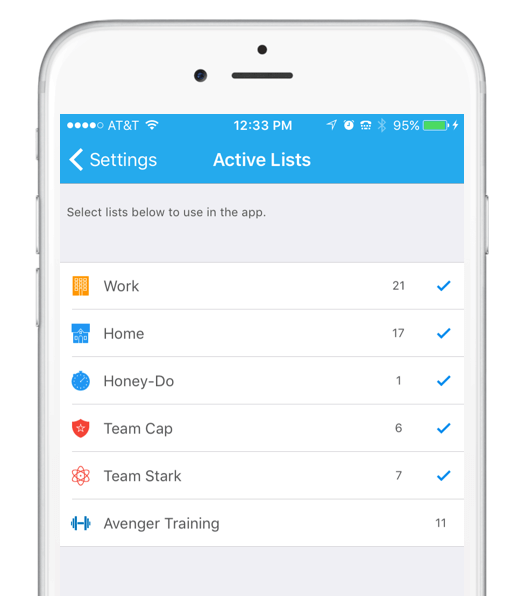
Hide lists – When accessing the general app settings (done by clicking on your name in the top left of the List View) you can access a setting called “Active Lists”. This allows you to control which of your lists are actively showing in your List View.
This is a great option to use instead of deleting a list. A common practice in Todo to create a list for a specific event (packing list, planning list, etc.). You’ll find yourself very active in that list but for only a confined amount of time. Instead of deleting and then recreating that list, what you’ll want to do is duplicate the completed tasks in the list (easily done with the Quick Menu) hide that list (so that it isn’t cluttering your List View thereby ensuring access to what’s present and most impactful), then un-hide the list when it’s time to use it again.
In the new Todo Cloud you’ve got quite a bit of control to make Todo “yours”. Now go and customize away.